For many, creating employee distribution lists in Outlook is a necessary evil.
It’s time-consuming, restrictive, and annoying to manage.
But waiting for IT to build you all of the relevant lists you need to segment and target your internal communications could also take millennia.
So we’re going to walk you through everything you need to know about creating employee distribution lists in Outlook, including:
- What distribution lists are and how they work
- The difference between distribution lists, distribution groups, and contact groups in Outlook
- How to create distribution lists in Outlook
- How to update old distribution lists in Outlook
- How to figure out if you even need to be making distribution lists in Outlook
- What employee distribution lists should you make if you want more effective communications
- The pros and cons of using Outlook to create employee distribution lists
- The pros and cons of distribution list alternatives
- Our recommendation for the best tool for creating employee distribution lists
What are Outlook Distribution Lists?
Outlook Distribution Lists, also called Distribution Groups or even Contact Groups depending on which version of Outlook you’re running, are groups of email recipients that are addressed as a single recipient.
They’re generally used to send email to groups of people (in your case, employees) without having to manually enter every single email address—which is a big deal when you work for a large organization and are managing communications for more than one location, department, or business unit.
When you’re looking at your contact list in Outlook, your Distribution Lists will show up as contacts as well, so they’re easy to find and use. They will also appear in your Address book, when you press the “To” button.
What’s the difference between distribution lists, distribution groups, and contact groups in Outlook?
Mostly, these terms can be used interchangeably when you’re referring to them in the Outlook / Microsoft technology ecosystem.
The term “contact group” is newer than “distribution list” and was likely updated to be a bit more self-explanatory so as to not confuse users.
In some cases, distribution lists are managed centrally for the entire organization, and the emails sent to these lists are usually sent from an associated email address that internal communications or human resources owns, rather than a personal email address.
Contact groups can be created personally in an individual email account in Outlook, so you can build custom contact groups. Keep reading to learn how.
Disclaimer: Building Distribution Lists for Outlook versions released prior to 2013 and Outlook for Mac
The instructions that we outline below only apply to versions of Outlook versions released in 2013 or later.
We’re not going to cover anything before 2013, so if you’re stuck using an ancient version of Outlook, we’re sorry (for everything).
Also, keep in mind that if you work at a large organization and you’re using Outlook for Mac, making a custom distribution list is pretty impractical. While it’s possible to create distribution lists in Outlook for Mac, you’ll have to manually find and select each individual user and add them to your custom list.
It’s time-consuming to say the least, but if you feel like doing that, we won’t stop you.

How to create employee distribution lists in Outlook
Note: Microsoft calls distribution lists “contact groups”, but they function in the same way.
Step one: Create a Contact Group
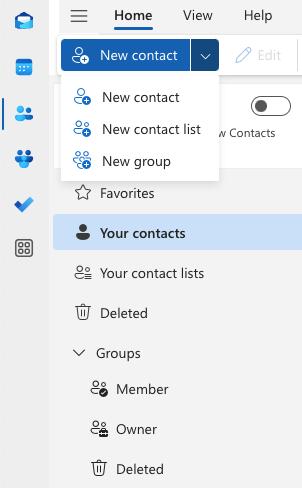
First, open Outlook and navigate to the ‘People’ tab using the people icon in the folder pane. You’ll find the folder pane on the left-hand side of your Outlook screen.

Next, click ‘New Group’ in Outlook’s main ribbon, located at the top of your screen.
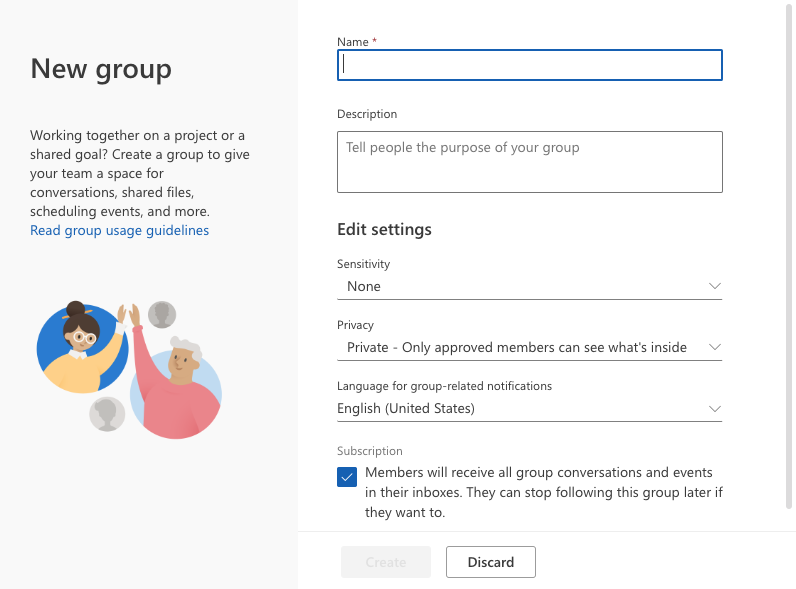
Step two: Name and populate your Contact Group
Once you’re in the New Contact Group window, enter a name for your group. Your group name should be useful, relevant to the group, and easy to find amongst your other Contact Groups. We recommend naming the group after the people who will populate it.
For example, let’s create a group for Staffbase’s Kelowna office.
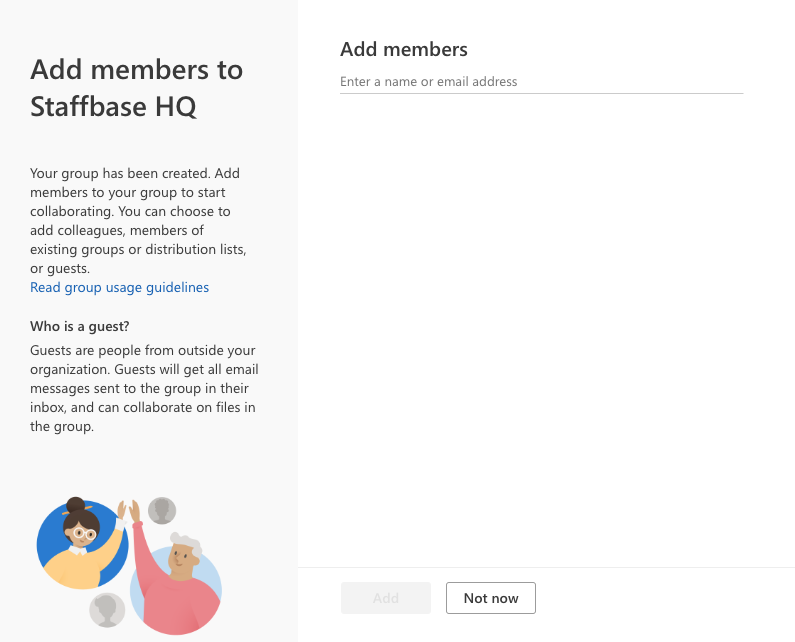
Now it’s time to add some members from your address book.
You can select members manually, or you can search by fields such as location or title if you have this information linked to your address book. Remember to select “More Columns” before searching for an additional attribute.
You can select as many contacts as you want before clicking the “Members” button followed by “OK.”
Step three: Don’t forget to save!
Step four: Use those lists!
Congrats! Now you have your very own, segmented distribution list that you can send to using the same emailing process you’re used to.
No complicated workarounds needed and no change in workflow.
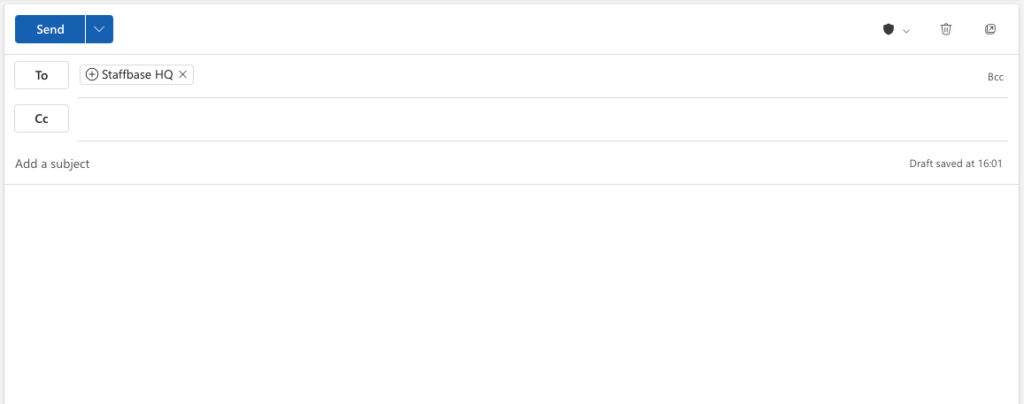
Next time you want to send an email that’s relevant or targeted to your new group, you can simply enter your new group name in the “To” field and you’re all set!

How to Update Distribution Lists in Outlook
Updating the distribution lists you create in Outlook is pretty straightforward.
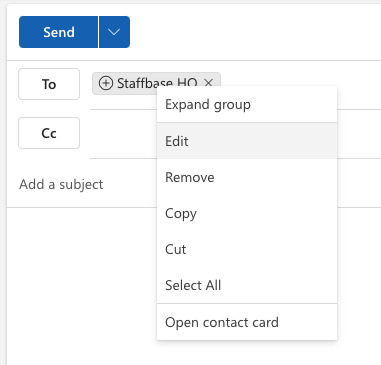
Simply create a new email, enter the list name in the “To” field and right-click on it.
From there you can reopen the contact group window and add or remove members.
6 Employee Distribution List Best Practices for Outlook
1. Keep them up-to-date . . . or else!
There are three big problems that will arise if you don’t keep your employee distribution lists up-to-date.
First, if you’re tracking email metrics like opens, clicks, or read time (which is a very smart and cool thing to do), sending internal communications to people who have left the company and therefore can’t open the email will send your engagement metrics into the ground.
Not only will it be a false indicator of how well your content is actually performing, you’ll likely have to justify the engagement crash to leaders. And if you have to explain that the numbers are off because of out-of-date lists, it may then be a struggle to get stakeholders to trust the data you’re collecting, hurting your ability to influence the strategy for the channel.
Second, if you’re targeting a specific segment of employees, by something like location or department with important information like policy or health and safety protocols, important people could be left out of the loop. That would not be good.
And finally, if an employee has left, their manager is likely going to get their forwarded emails. If your lists don’t stay up-to-date, those managers are going to receive your emails twice. This will not only be annoying but it will skew your metrics as well, bringing us back to the initial point about bad data.
If you have the option, opt for dynamic list creation that syncs with your HR system or other employee records program.
2. Create a system
Next, figure out and set up a process for how you’re going to use employee distribution lists across your organization. (Trust us, you’ll be thankful you did.)
First, decide whether you want to separate internal audiences and external stakeholders who might also receive your internal communications. Sometimes when you’re measuring the engagement of these audiences or if you have to tweak information you send to each group, you’ll want to separate them out. Stakeholder engagement might also impact your email engagement rates which won’t give you an accurate picture of what’s really resonating with employees.
Next, create lists for every relevant department, team, location, and business unit.
And then, create rules or protocols for when an email should go to an all-staff distribution list and when communications should be more targeted to specific lists.
These are just the first steps in creating a good employee distribution list system. Every organization and internal comms team is unique, so keep building until you’ve fleshed out processes and systems that cover all of your bases.
3. Keep it consistent
Develop a naming structure or descriptive system so that no matter which user needs to send to which list, they can easily find the correct information.
You should also decide which communications are going to come from which email address. This may not seem like a big deal, but having emails come from a consistent source is a best practice because it helps to ensure that emails don’t get missed by employees. If it’s always coming from the same address, they’ll expect it and know emails coming from that address are important.
And sender trust is key to getting those emails opened and clicked.
Also, don’t forget to keep your sending addresses short and easy to identify so they don’t look like scams addresses or spam.
4. Decide on ownership
If IT doesn’t need to have ownership over the lists, decide who else can and should manage the lists, and how they’ll get the information they need to create new lists and update existing lists.
This may mean working with IT, HR, and other internal departments that communicate to the whole organization. It’s key to develop these procedures and relationships early to avoid issues like inaccurate, out-of-date lists.
5. Build a relationship with IT
Often, you won’t have control over distribution list creation, so it’s important to communicate with IT about what lists you need, how often you’ll need them updated, and the process for requesting updates and changes. Having this determined at the outset will help you avoid headaches and conflict in the long run.
We have heard a lot of grief from internal communication professionals who don’t have the best relationship with IT or fear asking them for things because the process seems long and arduous.
And we get it. Sometimes it is a pain.
But investing in these relationships — not only with IT but with departments like HR — will have tremendous returns you’ll be very thankful for later.
6. Avoid reply-all drama
Every once in a while, someone receives an all-staff email, decides to reply, and ends up sending an email to every single person on the list.
That’s why it’s key to create moderators for your distribution lists if you’re using Outlook.
Messages sent to a moderated distribution list are screened by a designated moderator before being sent to all members of the group, stopping reply-alls in their tracks. Hallelujah.
If you own a list, you can set up moderation rules for it by going to its settings and adding moderators in the “Message Approval” settings.
How Should You Segment Employee Distribution Lists?

In short: however you want to.
There are loads of different ways to segment your lists so you’re creating relevant, targeted employee communications.
But a great place to start is with these seven employee segments:

1. Office locations
It’s pretty annoying getting emails that aren’t relevant to your office or location.
We’ve also learned firsthand from our customers that location-based lists are not only important for timely, location-specific communications—but are also critical for crisis communications.

2. Working style
If your organization now has hybrid workers, you may wish to communicate with these groups independently, especially if you send communications such as facility updates that are only relevant to employees who are working at that particular location.
3. Leadership teams or managers
Need to prep your leadership team in advance of sensitive company-wide communications?
To make sure you’re sending the right messages to leadership, break down your employee list by seniority or leadership level.
We’ve also seen organizations where managers may have company email addresses but individual employees do not, like in retail or manufacturing. In cases like that, we recommend building a distribution list of managers who are responsible for sharing corporate communications with their particular teams.

4. Job function or department
The experience that employees have in your organization is inherently linked to the team or department in which they work.
Reaching employees with targeted emails based on their job function or department will enable you to send relevant information to large groups of similar employees, and be more responsive to any issue that affects specific teams or departments.

5. Specific business divisions or units
Similar to segmenting employees based on their job title or department, targeting communications to larger business units, divisions, or specialized groups allows you to cut out information from your all-staff communications that are only really important to these specific groups.
How your organization is structured will inform what kind of groups or divisions you target. For example, you could group together all employees on the East Coast, all manufacturing teams, or all customer-facing departments.

6. Primary language
For enterprises with offices around the globe, having an employee distribution list for each language can help you make sure your messages resonate.
By targeting employees in their preferred or primary language (regardless of their physical location), you have the opportunity to translate or adapt important messages to ensure they are understood.
7. Tenure
Many organizations have different benefits and perks available to their employees based on how long they’ve worked at the company.
If you want to share information about benefits that are exclusive to long-time employees, you may want to segment your comms to avoid confusion.
Should you use Outlook Distribution Lists for Employee Communications?
Now that we’ve covered most of the ins and outs of Outlook Distribution lists, a question remains: Are Outlook Distribution lists the best option for your employee communications?
The Pros and Cons of Outlook Distribution Lists for Employee Communications
The Pros
- The quickest way to build a distribution list (if your organization has flawless contact data in Outlook).
- You likely already have access to create them.
- They’re straightforward for the tech-savvy user.
The Cons
- You can’t get analytics comparing email performance across different lists.
- Potential for reply-all drama.
- Require updating frequently.
- Earlier versions of Outlook have limits on the number of addresses you can include, typically between 50-70 contacts.
- You can’t exclude certain recipients from your communications if they’re already on the distribution list, unless you individually remove them.
- Even though Outlook 2010 and later versions allow unlimited addresses in distribution lists, your corporate environment, server, or even internet service provider may limit the size of your groups and block emails that have more recipients.
- Emails that have a lot of recipients are more often marked as spam by the recipients’ email provider.
- If you send to a Contact Group or Distribution List using the “To” or “CC” field, Outlook may expose all of the recipients’ email addresses to each recipient. This can take up a lot of space at the top of the email and also may be a privacy issue. While you can “BCC” a Contact Group, this is an easy step to forget if you send a lot of emails.
- Can be difficult to get support if you’re having issues. You’ll likely have to go through your own IT team or wait for community responses on their support forums. When something isn’t working, this may mean your important communications are delayed while you wait for help.
Three Outlook Distribution List Alternatives
After reading all this, you may be thinking that Outlook Distribution Lists are more trouble than they’re worth. And you’re not entirely wrong.
But in most large organizations, email clients are standardized across the entire company for security and operational reasons.
So what are your options?
Luckily, there’s still hope. We’ve talked with enough savvy internal communication professionals to know that there are some workarounds that may work for you too.
1. Microsoft 365 Groups
If you’re already using Microsoft 365, you can update your distribution lists to become “Groups.” This will allow you to dodge a lot of the drawbacks we listed above about using Outlook distribution lists.
But keep in mind that these “Groups” are not purpose-built for internal communication broadcasts. They were originally intended to facilitate cross-team collaboration by having one place where groups could come to share documents, discussions, notes, and files.
Also note that in order to use “Groups” in Outlook, you need to have a Microsoft 365 plan that supports Exchange online and SharePoint online, such as Business Premium, E3, or E5.
The Pros
- Creating new Groups is relatively easy.
- 365 Groups are a core feature and are often being improved.
- Have shared inboxes.
- Easy to add and remove members.
- Dynamic membership allows you to set group membership settings that automatically add or remove group members based on data from Azure Active Directory, so your lists stay up to date so long as your Active Directory is up to date.
- Groups can be set to private or public, allowing more people to follow if they’re interested in certain content or departmental updates.
- Gives members access to a shared document library, which is great if you share a lot of linked-out content in your emails.
- A group can be created along with an associated SharePoint library, OneNote notebook, Microsoft Teams, Yammer, Planner, and PowerBI.
The Cons
- Groups were built for collaboration across teams, not specifically for sending emails, so a lot of the functionality will go unused or may be confusing.
- You must be a global admin or Exchange admin to upgrade lists.
- Many kinds of distribution lists cannot be upgraded.
- Members have to be “following” the group in order to get messages in their personal inbox, otherwise they have to go to the group’s shared inbox to read messages.
- Once you name a Group it cannot be changed.
- When you upgrade your distribution lists to Groups, everyone in the group will get a welcome email, which might confuse employees, so you’ll have to do some onboarding.
- Technically, employees can leave groups and you can’t easily stop them.
- To get dynamic group membership, you need an Azure AD premium subscription.
- All members of a group are automatically granted permissions to edit shared data, including documents.
- Can be difficult to get support if you’re having issues.
The Verdict
Microsoft 365 Groups were built for collaboration between users, which can be an attribute or a drawback, depending on how your departments and teams are set up.
If you’re just sending emails, you’re better off using Distribution Lists. If you need additional collaboration features, use 365 Groups.
2. External marketing tools
There are soooooo many marketing platforms that allow you to send bulk emails to specific lists. (MailChimp, Constant Contact, MailierLite to name a few.) And they all offer a suite of delicious features like drag-and-drop email designers, tracking, and engagement metrics.
But a word of warning: these fancy tools are built for marketing, not internal communications, so they can pose some barriers you may not be able to work around.
The Pros
- If you have a small enough list, some of them are free.
- They are usually pretty user-friendly and intuitive.
- They come with design and metrics features.
- They allow a lot more flexibility with branding and design, allowing you to make more engaging emails.
- You can schedule and automate emails.
- You can personalize emails using merge fields.
- Some platforms allow you to identify and re-send to contacts that didn’t open the email.
The Cons
- Employees can unsubscribe (all of these marketing tools require an unsubscribe button by law).
- Emails sent from marketing platforms are more likely to be marked as spam.
- Potential security and legal issues with storing company email addresses on a marketing platform not built for purpose.
- Updating your lists will be 100% manual.
- External marketing tools often create web versions of your emails, which are technically discoverable and a big privacy concern.
- Employees may not be stoked that their engagement with your email can be tracked individually.
- Lack of individual support if you’re having issues with the platform.
The Verdict
External marketing tools are a fine choice if you don’t have any other options. They are definitely a step up from having to do everything in Outlook, but you will inevitably run into security, deliverability, and unsubscribe issues.
3. Create Custom Distribution Lists in Bananatag
Creating Custom Distribution Lists in Staffbase is pretty great (if we do say so ourselves).
And this is mainly because our tool was purpose-built for internal communications and is upgraded frequently based on feedback from internal communication professionals.
To create a distribution list, users just have to open up their employee app or company intranet and navigate to the Contacts tab.
The Pros
- Super user-friendly interface that works quickly.
- You don’t need IT to create new employee distribution lists.
- You can create dynamic distribution lists that sync with Azure Active Directory, and soon HRIS systems, so you always have accurate, up-to-date lists.
- You can upload and update lists using a simple CSV.
- You can schedule your communications.
- You can segment your email stats based on location, department, or other attributes stored in your HRIS.
- You can gather accurate engagement data across shared workstations and digital workspaces.
- You can follow up with only those employees who didn’t open your email, without seeing individual-level data, keeping employees’ privacy at the forefront.
- You can view a breakdown of email stats by segment, so that you can compare how the same message is received by different audiences.
- You get access to Staffbase’s awesome features, like our collaborative email designer, pulse survey features, metrics, and more.
- An amazing support team has your back if you need help with everything from technical difficulties to strategic advice.
The Cons
- You have to be a Staffbase customer (which is definitely not a bad thing).
- You’ll be kicking yourself because you didn’t switch sooner.
- Staffbase is an enterprise product typically used by organizations with 500+ employees
The Verdict
If you’re sending to more than 500 employees, there isn’t a more flexible or convenient option.
Step-by-Step Guide: How to Create Distribution Lists in Outlook
- Open Outlook: Begin by launching the Outlook application on your computer.
- Navigate to Contacts: Locate and click on the “Contacts” tab positioned at the bottom left corner of the Outlook interface.
- Initiate a New Contact Group: Within the Contacts tab, select the “New Contact Group” option to commence the creation process.
- Assign a Descriptive Name: Provide a clear and concise name for your distribution list in the designated field.
- Add Members: Click on “Add Members” and proceed to include contacts from your Outlook address book or manually input email addresses.
- Review and Customize: Take a moment to meticulously review your list. Make necessary adjustments by editing or removing members as required.
- Save and Conclude: Upon finalizing your distribution list, click on “Save & Close” to preserve your changes.
- Utilize Your List: To send an email, initiate a new message and input the name of your distribution list in the “To” field.
- Send Your Message: Compose your email and click “Send” to effortlessly distribute it to all members of your list.
The Winner: Staffbase
We’re only slightly biased, but hear us out.
Based on the pros and cons of all the options, you’ll likely agree that on paper, Staffbase’s features and functionality should get the job done quickly and easily, while also being IT and legal-friendly.
We built our platform for internal communications by listening to what internal communication professionals really need from an employee email solution.
And in the end, having something purpose-built that’s always being improved will save you headaches, energy, and hours of your time.
Want to see for yourself?
Reach out to us here at Staffbase and we’ll set you up with a customized demo. You can take our email designer for a spin and see for yourself if we’re really the best option.
FAQ: Creating and Managing Outlook Distribution Lists
Outlook Distribution Lists, also known as Distribution Groups or Contact Groups, are groups of email recipients addressed as a single entity. They simplify sending emails to large groups without manually entering each email address.
These terms are mostly interchangeable in Outlook. “Contact Group” is a newer term and is often used for groups created personally in an individual account. Distribution lists might be centrally managed and used by multiple people within an organization.
Outdated lists can skew engagement metrics, leave important people out of the loop, and cause managers to receive duplicate emails, leading to inaccurate data and potential communication gaps.
Outlook Distribution Lists are useful but have limitations such as lack of analytics and potential for reply-all mishaps. Consider the size of your organization and the complexity of your communication needs.
Staffbase: It is specifically designed for internal communications, offering dynamic list creation, easy updates, and comprehensive support, making it the best option for organizations with over 500 employees.
